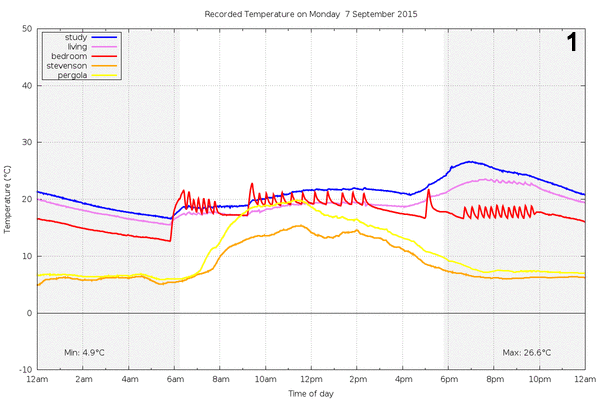
Here’s a week’s worth of temperature data from around my home. The blue, pink and red series are indoors. The orange and yellow series are outdoors - one inside a homemade Stevenson screen and the other under a pergola on the eastern side of the house.
I use a NodeMCU (ESP8266) device to drive B7971 nixie tubes using 8 x 74HC595 shift registers and 8 x SN75468 high voltage transistor arrays.
I talk about the code that makes this work, including using a Lua table to create a lookup table mapping characters to hex values that are sent to the shift registers to light the correct segments on the Nixie display.
I try out a cheap USB MP3/WAV module. Plug in a power supply, connect an amplifier, and load up a USB flash drive with MP3 and/or WAV files and you’re in business.
Could be quite useful to play a high quality sound effect from an embedded project, such as from an Arduino.
I use the SPI port on the NodeMCU (ESP8266) development kit to drive a 74HC595 8-bit shift register IC. This technique can be used to get 8 outputs using just three GPIO pins on the ESP8266.
I show the breadboarded configuration, the circuit diagram, and the Lua code needed to drive the shift register.
I teardown a $10 motion activated solar garden light from Kmart in Australia.
I bought this product to solve the problem of not being able to locate my house key on the key chain at night. But I couldn’t resist tearing it down to discover the electronics that make it work.
Unlike most solar garden lights, that use Nickel Cadmium (NiCd) or Nickel Metal Hydride (NiMH) battery technology, this unit is powered by a single LiFePO4 (Lithium Iron Phosphate) cell. These cells produce a nominal 3.2V, which means that with a bit of hacking this unit could probably be used to power a microcontroller such as an Arduino at 8MHz.
I connect some rather nice fairy lights to an ESP-12 module based on the ESP8266 chip, running Nodemcu firmware and a simple Lua script. I describe how to connect a P-channel FDN340P MOSFET and a 2N3904 NPN transistor to form a high-side driver to switch big loads from this tiny wifi module and its 3.3V logic.
The result: I can control my fairy lights over wifi, potentially from anywhere in the world using MQTT. The possibilities are endless, but for now I’ll enjoy the cool glow and shimmering reflections of my “Moroccan” fairy lights…
The Lua code for controlling the fairylights using MQTT can be found here:
In this video I make a breakout board for the ESP-12 wifi module using a plywood jig, wires, solder, scrap PCB, header pins, and hot melt glue.
I hook up the right combination of pull up and pull down resistors, and demonstrate it turning an LED on and off in response to MQTT messages. I draw up a circuit diagram to show how things connect.
Along the way I discover that GPIO4 and GPIO5 are swapped on the silkscreen of the ESP-12 boards I bought.
The Lua code for controlling the LED using MQTT can be found here:
https://github.com/lucsmall/Fairylights
I used the Nodemcu Devkit v1.0 schematic diagram as my reference:
Part unboxing, part overview, part debugging session and part tutorial, this video documents my first experiments with the Orange Pi Plus, a relatively recent Allwinner H3 SoC quad-core 1.6GHz single board computer coming out of China. I encounter some problems with HDMI, high load average, and spurious kernel messages, but the platform certainly shows promise. I’m using the Orange Pi port of Raspbian.
I try something I’ve never tried before - etching stripboard/perfboard/veroboard in ferric chloride etchant.
The idea was to create a breakout board for a Quectel L80 GPS module (based on the MediaTek MT3339 chip). This module has a 0.1in (2.54mm) pin pitch, which is rare for recent GPS modules. Most have 2mm or even finer pin spacing. This module’s pin pitch is a good match for common 0.1in stripboard.
I run into all sorts of dramas with cold, weak etchant that over-etched in places while under-etching in others. But a second attempt yielded an acceptable result. All’s well that ends well.
Would I use this technique again? Probably not. But it was an experiment worth trying.