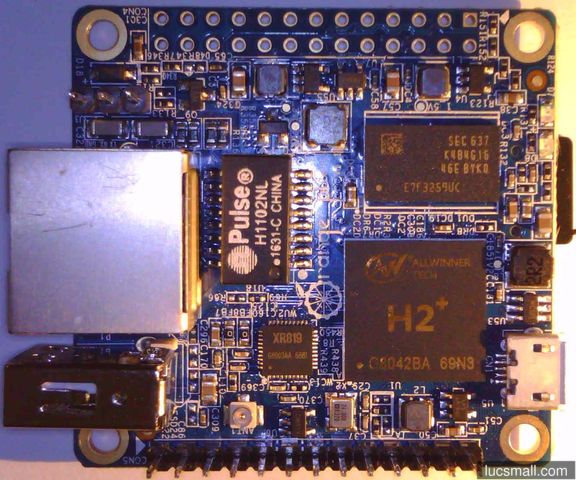
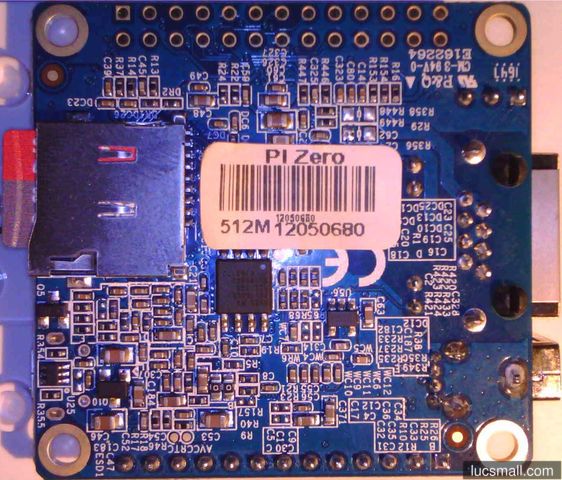
The Orange Pi Zero is a neat low cost single board computer:
- it is very compact (approx. 46 x 48mm).
- it forgoes things like HDMI connectors, making it ideal for headless, embedded applications.
- it supports wifi as well as wired ethernet.
- it is quite powerful, having an Allwinner H2+ system-on-chip (SoC) featuring a quad core ARM Cortex-A7 processor. Full specs and other useful information is available on the linux-sunxi.org wiki.
- Linux support is very good, thanks to Armbian.
- it is very cheap.
In this tutorial I provide step-by-step instructions to get a working Armbian Linux environment on the Orange Pi Zero.
What you need
As a minimum you’ll need:
- an Orange Pi Zero. There are two models with different amounts of RAM installed - a 512MB version and a 256MB version.
- a micro SD card. I used an 16GB SanDisk Ultra card.
- a stable 5V power supply rated at 2 amps and a cable with a micro USB plug. Many modern, good quality mobile phone chargers will do just fine.
You will also need a home network (i.e. a router) with a wired or wifi connection; internet access; and a desktop or laptop computer.
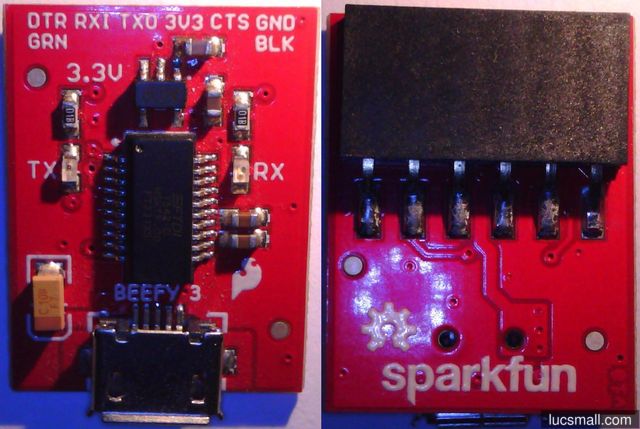
Although not strictly required, a USB-to-Serial converter designed for 3.3V TTL logic levels can really come in handy. I use the Sparkfun Beefy 3 which features the FTDI FT231X USB to serial chip. Whatever converter you choose, make sure it’s designed for 3.3V logic levels, not for 5V, and certainly not for RS232 signalling levels. You’ll also need three jumper wires to connect the serial converter to the Orange Pi Zero.
Software requirements
This tutorial assumes you’re working on a computer running Windows. We’ll need three pieces of software to complete the set up of our Orange Pi Zero:
- Download 7 Zip and install on your computer. You’ll need this to decompress the Armbian image we download later.
- Download the Win32DiskImager installer and install on your computer. Win32DiskImager allows us to write the Armbian image to the micro SD card.
- Download PuTTY SSH client from the PuTTY Download Page. Scroll down the page until you see the link to the Windows MSI installer package. It will be called something like putty-x.yz-installer.msi. Download this file, run it, and complete the PuTTY installation.
Downloading Armbian and writing it to the micro SD card
The Orange Pi Zero needs an operating system to boot. We’ll use Armbian, which has operating system images for many of the Orange Pi models, including the Zero.
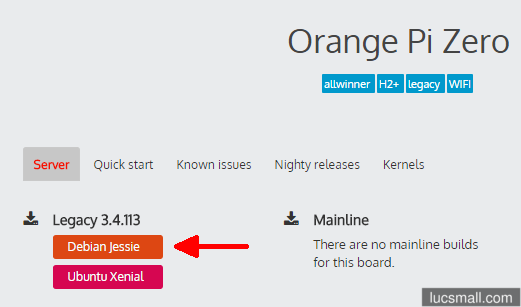
- Download the image for the Orange Pi Zero from the Armbian website. Select the Debian Jessie image. Within a few seconds the download should begin.
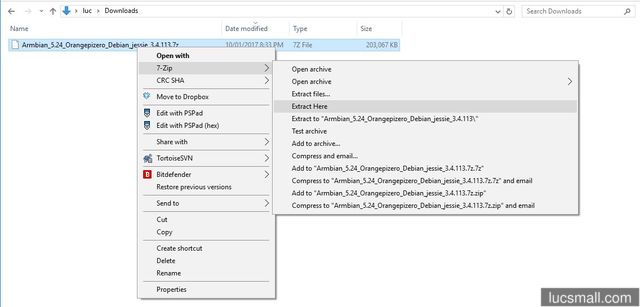
- When the download is complete, browse to your downloads folder and locate the file. It should be named something like Armbian_5.20_Orangepiplus_Debian_jessie_3.4.112.7z. Right click on the file, select 7-Zip from the context menu and choose Extract Here. The archive should expand, resulting in several files including one with a .img extension similar to Armbian_5.20_Orangepiplus_Debian_jessie_3.4.112.img.
- Insert your blank micro SD card into your computer. Take note of the drive letter it is assigned, for instance, D:.
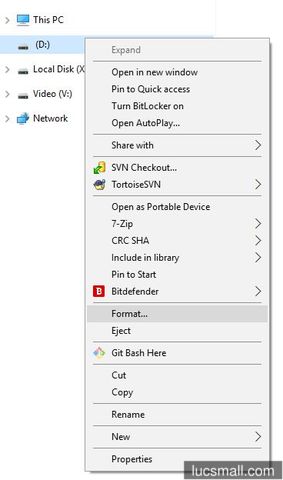
- Locate the drive for the micro SD card in Windows Explorer, right click on it and choose the Format… option.
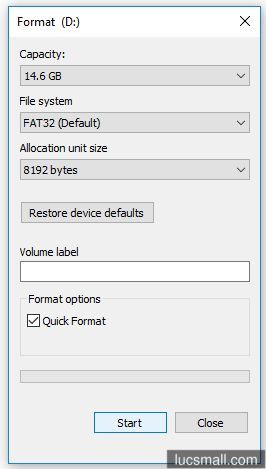
- Ensure File System is set to FAT32 (Default). Click Start and wait for the format to complete. Before doing so, make 100% sure you’ve selected the correct drive, otherwise you risk overwriting the data on another drive.
- Open Win32DiskImager by selecting it from the Start menu, or by hitting the Windows key, typing “Win32DiskImager” and hitting the enter key.
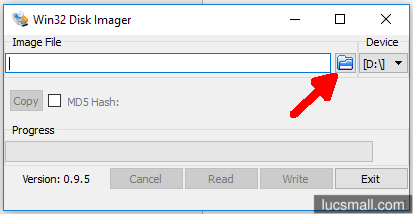
- Click the folder icon below the Image File label to browse to and select the Armbian img file (e.g. Armbian_5.24_Orangepizero_Debian_jessie_3.4.113.img).
- Under the Device label, select the drive letter of your micro SD card. In my case [D:\]. Again, make sure you are 100% certain you’ve selected the correct drive, otherwise you risk overwriting the data on another drive.
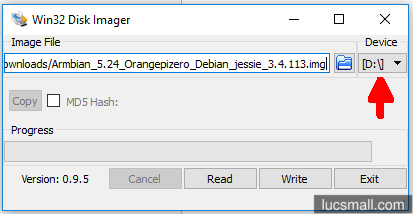
- Click the Write button to start writing the Armbian image to the micro SD card.
- When the writing process is complete, click the Exit button to quit Win32DiskImager.
- Use the Safely Remove Hardware and Eject Media option in the system tray to eject your micro SD card.
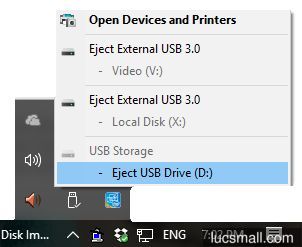
- Physically remove the micro SD card from your computer.
Booting your Orange Pi Zero
Our next step is to boot the Orange Pi Zero. The following steps assume that:
- you can connect your Orange Pi Zero to your router via a wired ethernet connection.
- your router automatically allocates IP addresses on your network using DHCP.
- you can login to the admin interface of your router.
If these conditions aren’t met, you’ll need to skip to the next section and follow the instructions there.
To boot your Orange Pi Zero for the first time:
- Insert your micro SD card imaged with Armbian into the micro SD slot on the Orange Pi Zero.
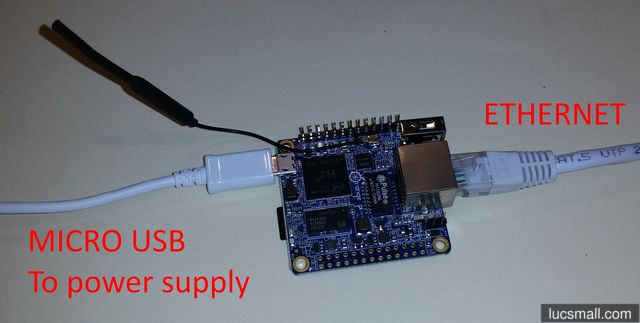
- Connect your Orange Pi Zero using an Ethernet cable to your router.
- Connect your 5V power supply to the Orange Pi Zero via the micro USB connection.
- Plug your 5V power supply into the mains.
Within a minute or two the LEDs on the ethernet port of the Orange Pi Zero should start to flash, indicating network activity. Assuming your router is configured for DHCP, the Orange Pi Zero should automatically obtain an IP address on your network.
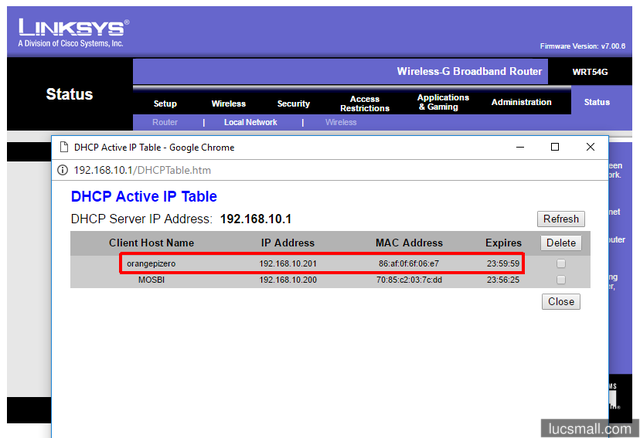
In order to log into the Orange Pi Zero, we need to know the IP address it has been assigned. Probably the easiest way to obtain this is to login to the administration interface of your router (usually provided as a web interface). It varies from model to model, but many routers will provide a screen which lists DHCP leases. With any luck it will be possible to identify the Orange Pi Zero in the list of DHCP leases and see which IP address it has been allocated. One approach is to take note of the IP addresses in the list before connecting your Orange Pi Zero to the network. Then connect your Orange Pi Zero to the network and to power, wait for it to boot (a minute or two) and refresh the list of DCHP leases. It should now have an extra entry and that entry should correspond to the IP address assigned to your Orange Pi Zero.
Knowing the IP address of the Orange Pi Zero, we can log into it for the first time. In order to do so, we need to use an SSH client to make the connection. In this tutorial we’ll use PuTTY.
- Open PuTTY by selecting it from the Start menu, or by hitting the Windows key, typing “putty” and hitting the enter key.
- Set the Host Name (or IP address) to the IP address of your Orange Pi Zero, as identified above.
- Ensure the Port is set to 22.
- Ensure the Connection type is set to SSH.
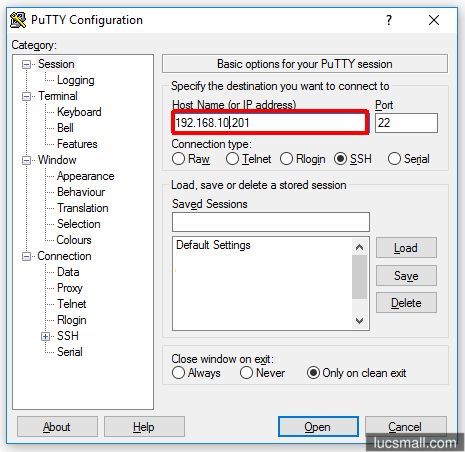
- Click the Open button.
- When asked to “trust this host”, click the Yes button.
- When prompted for a login, type root in lowercase and press enter.
- When prompted for a password, type 1234 and press enter. Note that your keystrokes will not be echoed back to you, but they are being received by the Orange Pi Zero nonetheless.
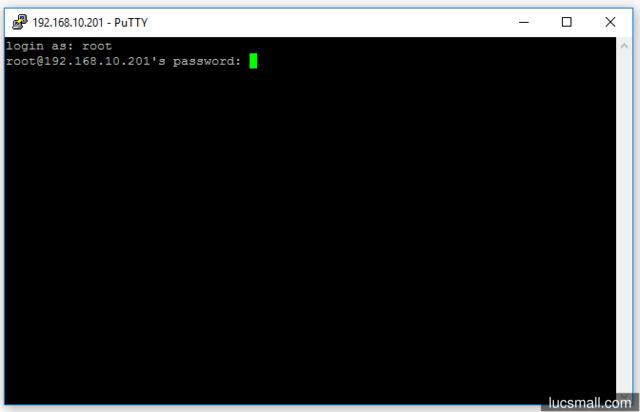
You will immediately be asked to change your password. To do so:
- Enter your (current) UNIX password as 1234 and press enter.
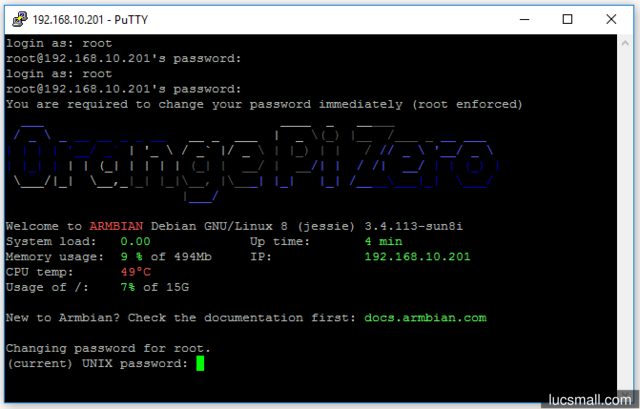
- At the Enter new UNIX password prompt, enter a new password and press enter.
- At the Retype new UNIX password prompt, enter the new password again and press enter.
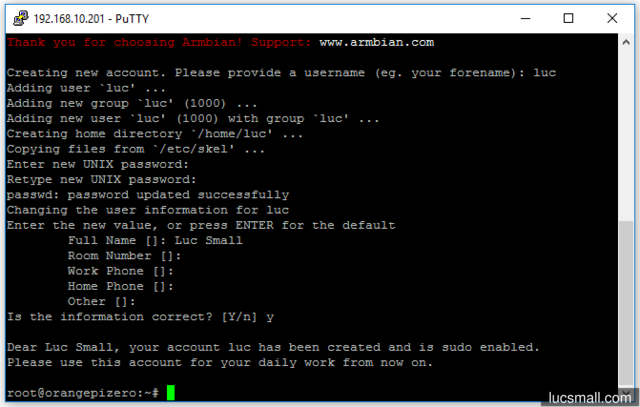
Next you will be asked to create a new account. This is a less privileged account for everyday use:
- At the Creating new account. Please provide a username (eg. your forename) prompt, enter a username for the new account and press enter.
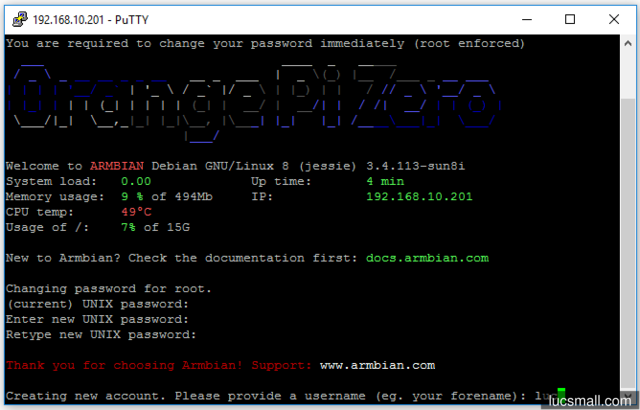
- At the Enter new UNIX password prompt, enter a password for this account and press enter.
- At the Retype new UNIX password prompt, enter the password again and press enter.
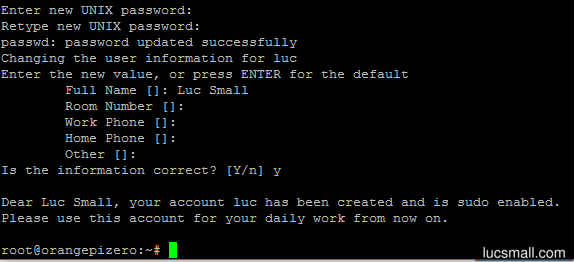
- You will be asked to enter your Full Name and few other details. Enter them, if applicable, or simply press enter for blank.
- When asked Is the information correct? [Y/n], press the y key and then press enter.
Within a few seconds you should be presented with a welcome message and a prompt:
Congratulations - you have logged into your Orange Pi Zero for the first time.
Before you forget them, record the details of your root account password and your newly created “everyday use” account somewhere secure.
Alternative strategy, using a USB-to-Serial converter
If you can’t determine the IP address of your Orange Pi Zero based on its DHCP lease, another approach is to connect to it via its serial console.
For more information about the Orange Pi Zero serial header, visit this linux sunxi wiki page.
In order to connect in this fashion you’ll need a USB-to-serial converter with 3.3V logic levels and three jumper wires.
To boot your Orange Pi Zero for the first time:
- Insert your micro SD card imaged with Armbian into the micro SD slot on the Orange Pi Zero.
- (Optional) Connect your Orange Pi Zero using an Ethernet cable to your router.
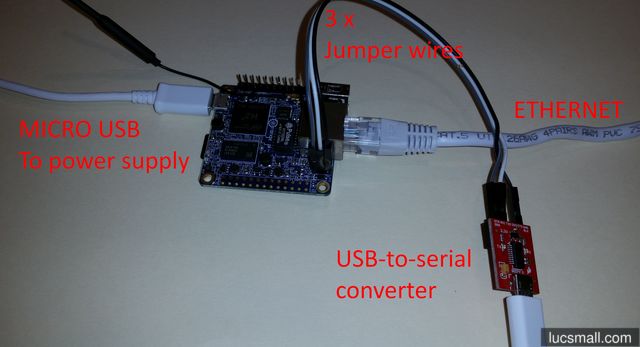
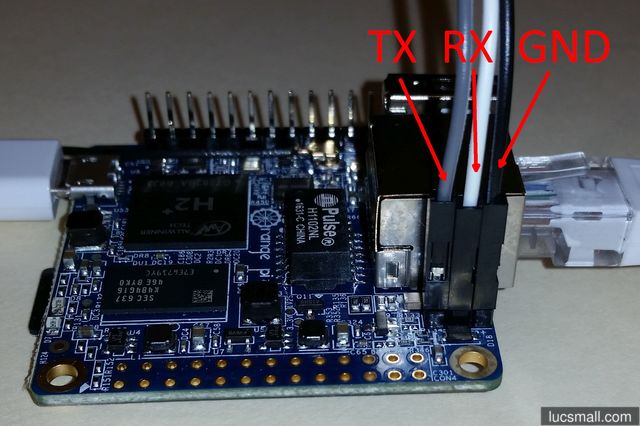
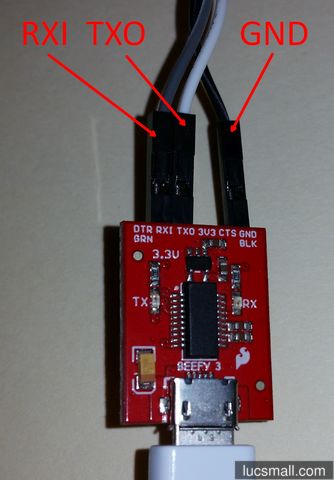
- Connect three jumper cables between your USB-to-Serial converter and the Orange Pi Zero. The serial interface on the Orange Pi Zero is exposed by a three pin header next to the enternet port. The header takes three signals:
- TX is the signal wire for data coming out of the Orange Pi Zero. Connect this to the RXI or RX input of your USB-to-serial converter.
- RX is the signal wire for data sent to the Orange Pi Zero. Connect this to the TXO or TX output of your USB-to-serial converter.
- GND is the common ground reference. Connect it to GND on your USB-to-serial converter.
It may be helpful to refer to the diagram and photos below.

- Connect your USB-to-Serial converter to a USB port on your computer.
- Open Device Manager by right clicking on the Start Menu and selecting Device Manager.
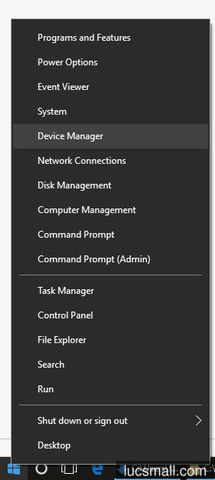
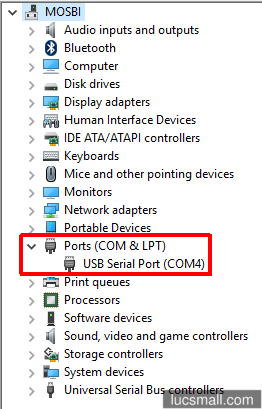
- Locate the COM port your USB-to-serial converter has been assigned by Windows, e.g. COM4:
- Open PuTTY by selecting it from the Start menu, or by hitting the Windows key, typing “putty” and hitting the enter key.
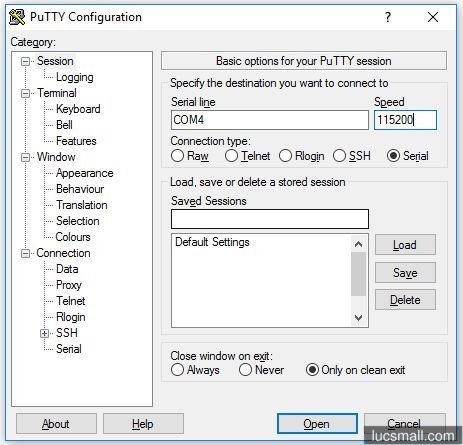
- Ensure the Connection type is set to Serial.
- Set the Serial line to the COM port assigned to your USB-to-Serial converter, e.g. COM4.
- Ensure the Speed is set to 115200.
- Click the Open button.
- Connect your 5V power supply to the Orange Pi Zero via the micro USB connection.
- Plug your 5V power supply into the mains.
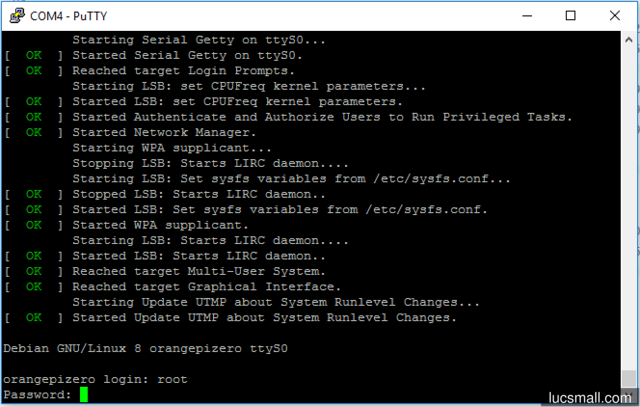
Within a few seconds, the PuTTY window should be flooded with console output:
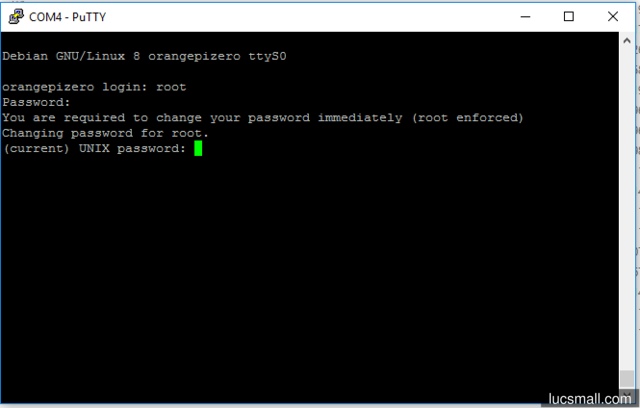
- When prompted for a login, type root in lowercase and press enter.
- When prompted for a password, type 1234 and press enter. Note that your keystrokes will not be echoed back to you, but they are being received by the Orange Pi Zero nonetheless.
You will immediately be asked to change your password. To do so:
- Enter your (current) UNIX password as 1234 and press enter.
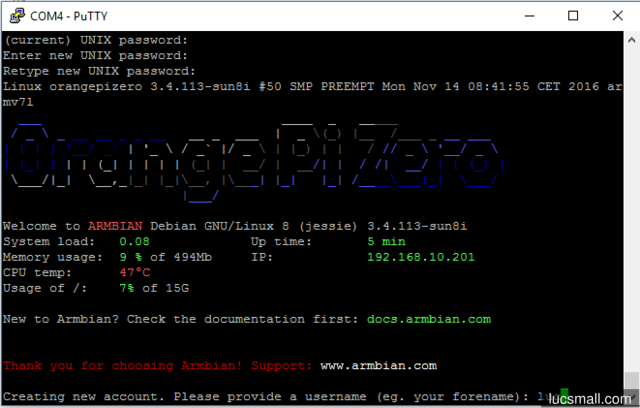
- At the Enter new UNIX password prompt, enter a new password and press enter.
- At the Retype new UNIX password prompt, enter the new password again and press enter.
Next you will be asked to create a new account. This is a less privileged account for everyday use:
- At the Creating new account. Please provide a username (eg. your forename) prompt, enter a username for the new account and press enter.
- At the Enter new UNIX password prompt, enter a password for this account and press enter.
- At the Retype new UNIX password prompt, enter the password again and press enter.
- You will be asked to enter your Full Name and few other details. Enter them, if applicable, or simply press enter for blank.
- When asked Is the information correct? [Y/n], press the y key and then press enter.
Within a few seconds you should be presented with a welcome message and a prompt:
Congratulations - you have logged into your Orange Pi Zero for the first time.
Before you forget them, record the details of your root account password and your newly created “everyday use” account somewhere secure.
To find out the IP address assigned to your Orange Pi Zero:
- If you haven’t done so already, connect your Orange Pi Zero using an Ethernet cable to your router. Wait a few seconds.
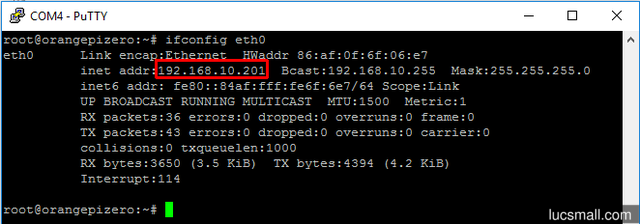
- Type ifconfig eth0. The assigned IP address should appear immediately after the text inet addr:.
Now that you know the IP address, in future you can follow the steps in the previous section to connect to your Orange Pi Zero over the network.
To disconnect your serial console:
- Cleanly shutdown your Orange Pi Zero by typing halt followed by enter. Wait until the console shows “System halted”.
- Disconnect power to the Orange Pi Zero.
- Disconnect the three jumper wires between the Orange Pi Zero and the USB-to-serial converter.
- Disconnect the USB-to-serial converter from your computer.
Initial configuration
Now that the Orange Pi Zero is working, we can do some initial set up. The following assumes you are logged into your Orange Pi Zero using either SSH or the serial console with your everyday account. Remember to hit the enter key after typing in each line of commands.
First we’ll update Armbian to the latest version:
sudo apt-get update
sudo apt-get upgrade
The first time you use sudo in a session, and periodically thereafter, you will be prompted for your pasword. Depending on the speed of your internet connection and the size of the update, the upgrade process can take a while.
Next we’ll set the time zone to match your location. To do so, enter the following command:
sudo dpkg-reconfigure tzdata
Then,
- Use the arrow keys to select your Geographic area and press enter.
- Select a city or region within your time zone and press enter.
Your timezone will be updated and you will be returned to the command line.
Lastly, we’ll set up wifi. This is super handy because once set up, our Orange Pi Zero can be placed anywhere within wifi range where it can be provided with power. To do so,
Open the file /etc/network/interfaces for editing:
sudo nano /etc/network/interfacesAdd the following 4 lines to the end of the file, substituting the actual network SSID and WPA password for your wifi network:
 auto wlan0
 iface wlan0 inet dhcp
 wpa-ssid <Your Access Point Name aka SSID>
 wpa-psk <Your WPA Password>
To save your changes, hit the key combination Control+O.
- To quit back to the command prompt, hit the key combination Control+X.
Bring up your wifi connection with the following command:
sudo ifup wlan0
You can find out the IP address assigned to your wifi connection by typing:
sudo ifconfig wlan0
The assigned IP address should appear immediately after the text inet addr:.
You can observe the signal strength and other details of your wifi connection by entering:
sudo iwconfig wlan0
Handy Hints
To monitor the temperature, CPU speed and other interesting details of your Orange Pi Zero type:
sudo armbianmonitor -m
(To quit and return to the command line, hit the key combination Control+C.)
To cleanly exit your PuTTY session while leaving your Orange Pi Zero running, type:
exit
To cleanly shut down your Orange Pi Zero before disconnecting power, type:
sudo halt
To reboot your Orange Pi Zero, type:
sudo reboot
Taking it further
Here are just some things you can do now that your Orange Pi Zero is operational:
- Check out the Fine Tuning section of the Armbian user guide for additional configuration you can perform.
Your router could decide to assign a different IP address to your Orange Pi Zero ethernet and wifi interfaces in future. If that happens, you’ll have to rediscover the IP address(es) of your Orange Pi Zero… But many routers have the ability to assign fixed (aka static) IP addresses. To do this, you need to know the hardware address of the interfaces on your Orange Pi Zero. To discover these type:
  sudo ifconfig eth0 | grep -i hwaddr
  sudo ifconfig wlan0 | grep -i hwaddr
The hardware address will be the jumble of hexadecimal numbers separated by colons, e.g “8c:ff:a3:06:b5:1b”, at the end of the line. In your router configuration you need to add a mapping between the hardware address and the fixed IP address to be assigned to the interface.
- Add a heatsink to H2+ chip on your Orange Pi Zero - it runs pretty hot without one.
- Put in your Orange Pi Zero in a nice box.
- Track aircraft in your area with a cheap USB DVB-T television receiver dongle.
Have fun!
